What does a visual merchandiser (VM) do?
DepartmentStore and customerModulePLM
The visual merchandiser (VM) is the person who plans how a fashion brand's products will be placed in the store and the window and in which outfits they will be displayed, and carries this visual standard from head office to the stores.
 Card: Locked · your progress is saved in this browser · save it to your account
 PIMLAND 17 · PLM
Visual merchandiser (VM)
Store and customerVisual merchandiser (VM), in short
The layout is built with beauty and judged by sales data.
- Prepares window and floor concepts, writes planograms and photo instructions.
- Checks how they're applied and rebuilds the layout based on sales data.
- Season rhythm: concept, instruction preparation, opening, mid-season change, campaign, season changeover.
- The most important documents are the drop calendar, the allocation list, the planogram and VM instruction, and the implementation photos.
- Match the instruction with the allocation list; provide a backup layout for missing products.
- Judged on the instruction being applied correctly and on time, and on sales movement after the layout change.
- Season and drop calendar
- Shipment and product allocation list
- Planogram and VM instruction
- Implementation photos
 Merchandiser
 Store sales associate
 Collection manager
Read in detailall documents, workflow, cases
- Prepares window and floor setups from the season's products: which product, on which table, on which wall, in which outfit.
- Writes the planogram and the visual layout instructions; sends them to the stores with a photo guide.
- Visits stores or checks execution from the photos sent in; fixes gaps together with the store team.
- Plans season transitions and campaign periods: new product intake, sale area, window change.
- Looks at sales data; moves best sellers to the front and tries slow sellers in a new outfit or a new spot.
In a season
- Pre-season
The collection and drop calendar is learned; window and floor concepts are drawn up by theme.
- Instruction preparation
The layout set up in the sample area is photographed; the planogram and VM instruction go out to the stores.
- Season launch
Stores set up the new layout; photos come in, differences are corrected.
- Mid-season
The layout changes based on sales data; displays are rebuilt for sold-out sizes and colors.
- Campaigns and sales
The sale area and campaign window are set up; they are balanced in the same store with the new season's first products.
- Season transition
The old season is cleared away, the new season's window opens; notes from stores become lessons for the next instruction.
Who do they work with?
- Merchandiser
- Store sales associate
- Collection manager
 Stylist
 Fashion designer
 Middle manager
From school to work
| What you learned at school | At work |
|---|---|
| You learn color, composition and a sense of space. | At work, that sense is applied to a table, a wall and a window. Where does the eye look first, which path does the customer walk: the layout is built around this. |
| You learn to put outfits together and read a collection as a theme. | At work, an outfit shows the customer a second product. The pants under the jacket on the mannequin are on the rack right next to it. |
| You learn to show your idea with drawing and presentation tools. | At work, that presentation becomes an instruction that lets a store team hundreds of kilometers away set up the same layout. A clear photo and a precise planogram work better than a long explanation. |
| You learn to follow trends and the fashion world. | At work, the trend meets the product the brand actually has. Trend and market research appear in every VM ad. |
| You work with spreadsheets and data for the first time. | At work, sales data becomes the compass for the layout; most VM ads ask for a commercial mindset and sales data. A beautiful layout is a layout that sells. |
What do job ads ask for?
From 242 fashion and retail job ads published in Turkey in August–October 2026.
Separate job ad
In the sample of 242 job ads, visual merchandising (VM) has 8 unique (12 raw) ads; 7 are non-managerial, and 1 is an entry-level ad with an assistant title. Most are store and head office ads from fashion brands.
Store, floor and window layout
It appears in all 8 ads; trend and market research also appear in all 8.
Sales data and commercial sense
In 6 of the 8 ads. Excel appears in 4, English in 3.
Travel
3 of the 8 ads ask for no travel restrictions: the visual merchandiser (VM) travels to stores.
Experience
Non-managerial ads that state years ask for 2 to 5 years of experience. In store ads, visual display is also part of the sales associate's job: store, floor and window layout appears in 51% of the 72 store ads among the 242. This experience gained in the store becomes the start of the road to VM.
The first 90 days
- Study the brand's VM guide and the window photos from the last two seasons; match which products each window featured.
- Walk through a few stores: the path customers take as they enter, the table people look at most, the wall that's hardest to fill. Keep your notes with photos.
- Read a store's weekly sales report side by side with the layout; start to see the link between a product's location and its sales.
Which field of study?
Interior architecture, fashion design, fashion management, visual communication design, industrial design and stage design are good backgrounds. What counts is your portfolio and store experience; many visual merchandisers start in the store as a sales associate or a VM assistant.
Telling the product's story without saying a single word to the customer.
From the inside: documents, decisions, cases
Documents, handovers, decisions and mistakes that happen on the job.
A working day
- 09.00
You look at the layout photos stores sent last night; you mark the points that deviate from the instruction.
- 09.30
You read the weekly sales report: which product stood out, which table is slow, which sizes sold out.
- 10.30
Meeting with the merchandiser: next week's shipment, new products coming in, products going on sale.
- 11.30
In the sample area, you set up the new theme's table; you try out outfits and photograph them.
- 13.30
You write the planogram and VM instruction: product code, location, order, color and size arrangement, photo.
- 15.00
You visit a store: you set up the wall together with the store team and explain the reasoning behind the layout.
- 16.30
With the store manager, you discuss the areas that couldn't be set up because of missing sizes and agree on a replacement layout.
- 17.30
You match window and launch visuals with digital marketing and get tomorrow's instructions ready to send.
A sample day; hours vary by company and season.
Workflow: before you, after you
- 1Learn the season's products and dates.
- Input
- Season and drop calendar, product list
- Output
- Window plan by theme and date
- Handover
- Merchandiser
- 2Check the quantities going to the store.
- Input
- Allocation list, store spaces
- Output
- Note on product needs by space
- Handover
 Planning specialist
- 3Set it up in a sample space, photograph it, write the instructions.
- Input
- Products, visual merchandising guidelines
- Output
- Planogram and photo instructions
- Handover
- Store sales associate
- 4Bring the window and the digital launch together in one story.
- Input
- Window plan, launch calendar
- Output
- Matched window and social media visuals
- Handover
 Digital marketing and content specialist
- 5Check the execution, fix the gaps.
- Input
- Store photos, visit
- Output
- Correction list and visit note
- Handover
- Middle manager
- 6Update the layout based on sales.
- Input
- Sales report, stock status
- Output
- Updated layout and recommendation
- Handover
- Merchandiser
Documents that pass through your hands
| Document | From | To | When | What for |
|---|---|---|---|---|
| Season and drop calendar | Collection manager and merchandiser | Visual merchandiser | At the start of the season, and whenever it changes | When each product group arrives in store; the date of the window change comes from here. |
| Shipment and product allocation list | Merchandiser and planning | Visual merchandiser | Before shipment | Which products go to which store, and how many. The layout is built with the products the store will actually receive. |
| Visual merchandising guidelines | Head office visual merchandising team | Stores | At the start of the season | The brand's fixed rules: hanger direction, color order, folding, mannequin and window language. |
| Planogram and VM instructions | Visual merchandiser | Store team | At every season change and campaign | Product placement for tables, shelves, walls and windows; with photos and product codes. |
| Execution photos | Store team | Visual merchandiser | After the layout is set up | Checking remotely whether the instructions were carried out correctly. |
| Store visit note | Visual merchandiser | Store manager and head office | After the visit | The layout you saw, the corrections made, the store's needs and suggestions for the next instructions. |
Decisions
- Where each product goes and what it is styled with on tables, shelves, walls and windows.Approved by: Your decision; it stays within the visual merchandising guidelines.
- Moving a slow-selling product to a more visible spot.Approved by: You propose it; you decide together with the merchandiser.
- Departing from the instructions in a store because of missing sizes or products.Approved by: Together with the store manager; you record the change with photos.
- A new window language outside the visual merchandising guidelines.Approved by: The head office manager responsible for visual merchandising and the brand.
What are you evaluated on at work?
- Instructions carried out in stores on time and correctly
- Sales movement of the products involved after layout changes
- Consistency of the visual standard across stores
- Season change and campaign layouts ready on schedule
- Feedback from store teams reflected in the next instructions
Common mistakes on the job
Writing instructions without looking at the products the store will receive.
ResultThe store can't build the layout; empty spaces get filled at random.
PreventionMatch the instructions with the allocation list; give a backup layout for missing products.
Using a product in a look that is not on sale or not in the store.
ResultThe customer looks for the piece on the mannequin and can't find it.
PreventionCheck the code and store stock of every product in the look.
Leaving old and new products mixed during the season change.
ResultThe theme gets lost in the store; the new product stays unseen.
PreventionWrite a step-by-step plan for the change: which space is cleared first, and which space the new season starts from.
Judging the layout only by how it looks.
ResultThe best seller may stay at the back while the slow seller stays at the front.
PreventionLook at the sales data after every layout change.
Sending instructions only in writing.
ResultEach store interprets them differently; the same brand looks different.
PreventionSend a planogram with photos and a list with product codes.
Case: what would you do?
Case 1A coat is the focus of the new season window. Word comes from one store: the coat's middle sizes sold out in the first two days, but it is still in the window.What do you do?
A good answerYou inform the merchandiser with sales and stock data and find out whether an extra shipment is possible. Meanwhile, you agree with the store manager to put a product from the same theme with enough stock into the window, and you record the change with photos.
A customer who finds the product from the window in their size buys it; a fast-selling signal is also information head office needs to know.
Case 2The planogram you sent has six colors on one table. The manager of a small store says only four colors fit on the table.What do you do?
A good answerYou pick the four best-selling colors based on sales data and prepare a separate planogram for small stores; you also write where the other two colors will go. In the next instructions, you give options by store size.
Every store's space is different; instructions that can actually be carried out are the shortest way to protect the standard.
Case 3Digital marketing is introducing the new collection with a light-colored theme. The window plan you prepared was set up in dark colors the same week.What do you do?
A good answerYou put the launch visuals and the window plan side by side with digital marketing. You update the window so it carries the same products and the same main idea, and you tie the dates to the calendar together.
When customers recognize the product they saw on screen in the store window, the brand has told a single story.
Think of your own answer first, then open it.
How does this position work with the world?
The language of visual merchandising is largely English: visual merchandising, planogram, window, fixture, focal point, look. At brands with stores in many countries, the VM guidelines come from head office in English and are adapted for local stores; some VM job ads in Turkey ask for English. A product's theme, group and color information comes from the product record born in PLM; the same record reaches the customer in the store through the digital product passport.
What changes with PLM?
| Before | With PLM |
|---|---|
| The list of products going to the store arrives by email and in different spreadsheets. | The products' season, theme and group are in the product record; the window plan is built from the same source. |
| When the store arrival date changes, the instructions keep the old date. | The season calendar is in one place everyone can see; the instruction date is updated along with the calendar. |
| Products in the planogram are described by name and photo, and the store struggles to find the right product. | Every product in the planogram is matched by its code and by the image on the product card. |
Career path
- Sales associate in a store or VM assistant
- Visual merchandiser (VM)
- Regional visual merchandiser or senior visual merchandiser
- Middle manager (visual merchandising)
Glossary for this position
- Planogram
- The layout plan showing which product stands on which shelf, rail or table in the store and the window, and in which outfit.
- Visual merchandising
- The work of planning how the product will be displayed in the store and the window, the shelf layout and the mannequin setup.
- Merchandising
- The work of planning for the right product to go on sale at the right price, in the right quantity and at the right time.
- Season (SS/AW)
- Grouping collections by selling period: Spring/Summer (SS) and Autumn/Winter (AW).
- Drop
- Releasing a collection for sale in parts on set dates, rather than all at once.
- Capsule collection
- A small collection of a few pieces built around a specific theme or collaboration.
- Line plan
- The collection plan showing, for each category of a season, how many styles, which price band, how many colors and what quantity will go out.
- Sell-through (sales rate)
- The ratio of units sold in a period to units offered for sale in the same period.
- Markdown (discount)
- Lowering the price of a product whose sales fall below expectations.
- Variant
- Each sellable option of the same style, distinguished by attributes such as color and size.
- SKU (stock keeping unit)
- The code that uniquely identifies each product option held in stock.
- Attribute
- A field value that describes a product and is used in search, filters and reports: season, product group, style, tag and so on.
- DPP (digital product passport)
- A structure that links a product's identity, material, care and end-of-life information to a digital record opened by a QR code on the product.
What does the work look like on screen?
The visual merchandiser displays the product in the store, but the product's information is born in Pimland. In this tour, you'll see the season dates, the product card, the attributes used for grouping and the passport the customer scans in the store.
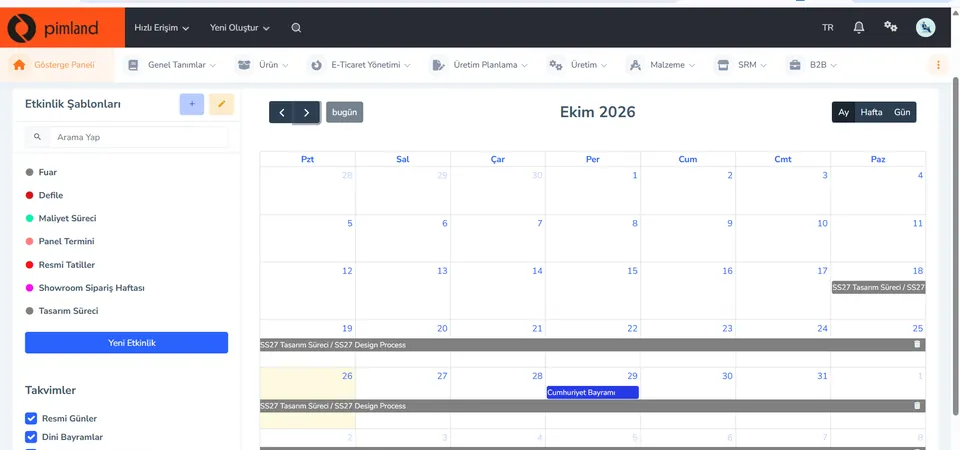
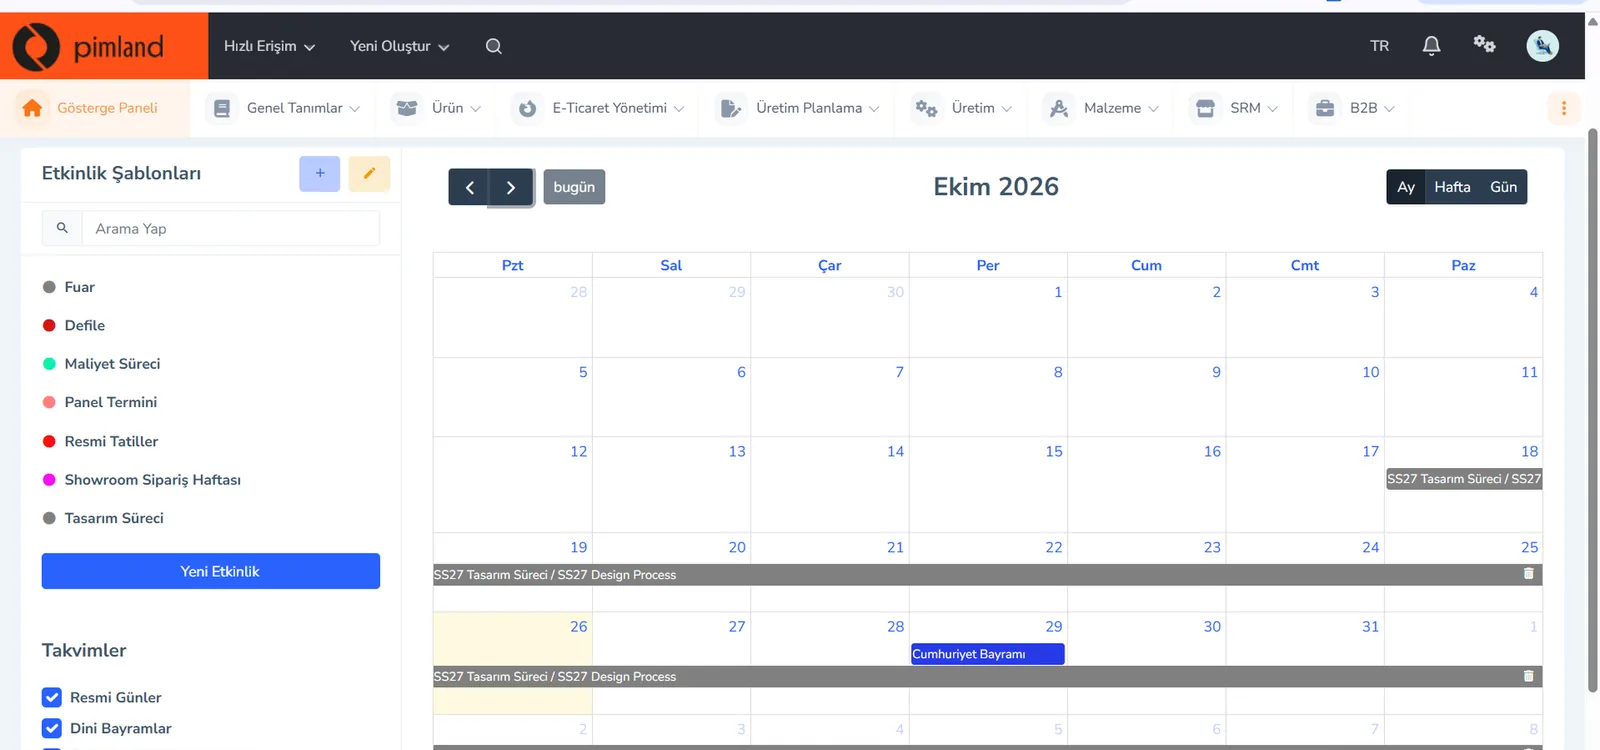
Screen from the demo environment; brands and amounts are demo data. Step 1Plan the season change from the calendar
In the season calendar, event templates are on the left: trade fair, fashion show, costing process, panel deadline, showroom order week, design process. You open the calendar in month, week or day view; public holidays are in the same calendar.
In real working life, the window change is tied to the product calendar. If the product's store arrival date slips, the instruction date slips too.
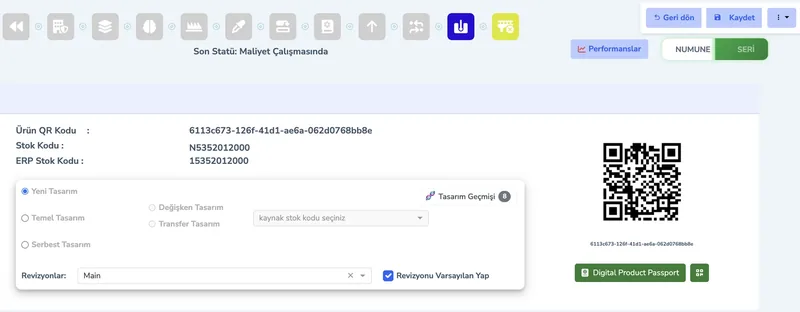
Screen from the demo environment; brands and amounts are demo data. Step 2Look at the product card
At the top of the card are the status bar and the latest status. Next to them are the design history, revision selection, the sample-to-bulk transition, the product QR code and the Digital Product Passport button.
In real working life, the window plan is built with the final approved product. The layout you set up in the sample space should hold the bulk product going to the store, not a sample.
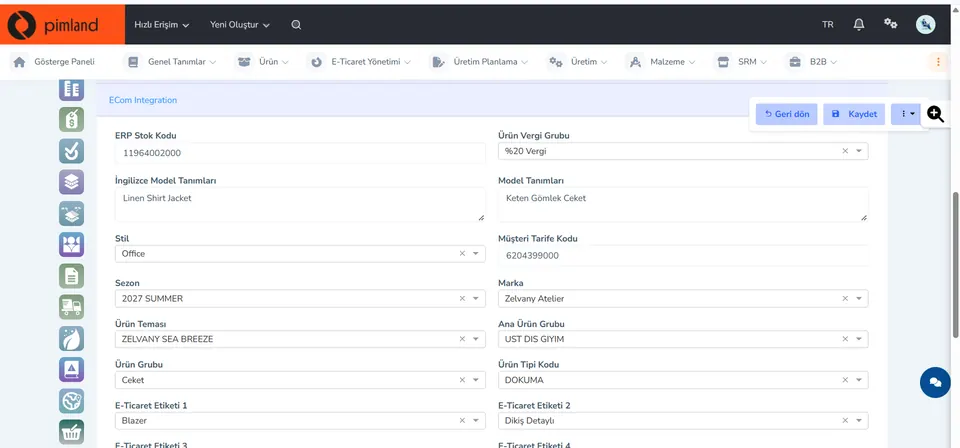
Screen from the demo environment; brands and amounts are demo data. Step 3Group products by theme and group
On this tab of the product card, season, brand, product theme, main product group, product group, style and product type code sit side by side.
In real working life, the floor layout starts with these fields: products from the same theme together, the colors of the same product group on one wall. If the fields are right, the planogram is built right too.
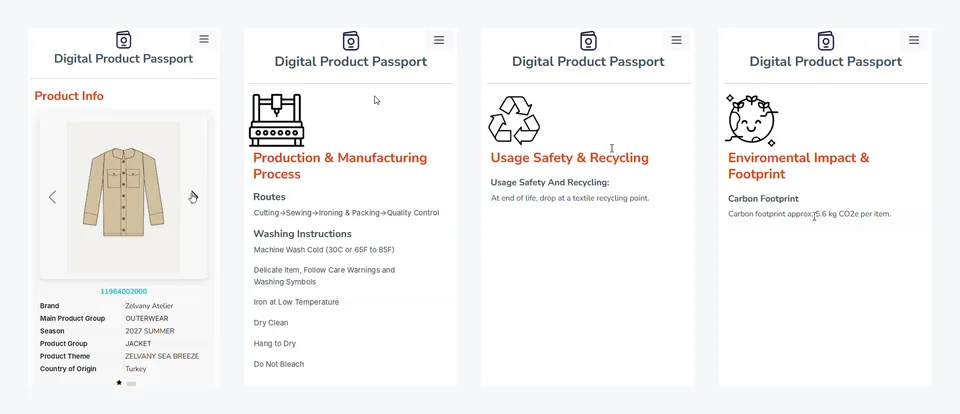
Screen from the demo environment; brands and amounts are demo data. Step 4Think about where the QR code goes in the store
The QR code on the product opens the digital product passport on a phone. Four sections: product information, production and care, safe use and recycling, environmental impact.
In real working life, the customer picks the product off the shelf and looks at its label. When you set up the layout, you make sure the label and the QR code stay within reach.


These screens are from the Pimland PLM module.
Open your card
Open your card
Read the short summary and the Pimland screens and answer at least 2 of 3 questions correctly to open the card. When all 20 cards are open, your Pimland Basic Certificate arrives in your account automatically.
How fashion, retail and manufacturing companies work, and 20 position cards
First the required reading, then the cards for 20 positions: you learn how a fashion company works.
- FirstTraining 1: How is a product born? · read to the end and complete it
- Each cardA summary of the position, audio narration and Pimland screens
- Card3 short questions at the end of each part; 2 correct answers open the next part · no time limit
- AccountWith a free account, your progress follows you on every device
- At the endOnce you complete all 20 cards, the Pimland Basic Certificate arrives in your account automatically
Certificate 1 · Pimland Basic Certificate
Reading is open to everyone; the part questions and the certificate require an Academy account.
PLM, PIM and SRM trainings
The shared language of the fashion world: PLM, PIM and SRM, with Pimland's real screens.
- OrderFirst PLM, then PIM, then SRM · one at a time
- Each training8 parts, in order · audio narration and Pimland screen
- Questions3 questions at the end of each part, 24 in total · 2 correct answers open the next part · no time limit, the questions change with every attempt
- UnlockPart questions open after your Basic certificate
- Verification14+ (date of birth in your profile); an e-Devlet education document for Turkish nationals
- At the endOnce the three trainings, ID and document are complete, Certificate 2 arrives in your account
Certificate 2 · Pimland PLM · PIM · SRM Certificate
Reading is open to everyone; the part questions and the certificate require an Academy account.
PRO · advanced training
Separate application, for selected candidates.
- WhoCandidates selected from applicants who hold both certificates
- OnlinePimland PLM software training and test
- On site1 day inside a fashion company, seeing PLM in use
- ApplicationWith “Apply for PRO training” on the PRO page; places are limited, and selected candidates hear back by email
Certificate 3 · Pimland PRO Certificate
Reading is open to everyone; the part questions and the certificate require an Academy account.
FAQFrequently asked questions about the visual merchandiser (VM)
4 questions
The merchandiser plans which product goes on sale, in what quantity, at what price and when. The visual merchandiser plans how that product will look in the store and the window. One sets the quantity, the other the layout; both look at the same sales data.
The layout plan showing which product stands on a table, shelf or wall, in what order and in which color and size. It usually goes to the stores together with a photo instruction.
Interior architecture, fashion design, fashion management, visual communication design and industrial design are good backgrounds. Job ads ask for store layout, trend tracking and sales data; store experience is a strong start.
They are closely related jobs. A window designer focuses more on the concept of the window; a VM specialist manages the window as well as the table, shelf and wall layout inside the store, and makes sure this layout is set up the same way in every store. Some job ads use both titles together.
· Pimland Academy team